


Showing posts with label ubuntu. Show all posts
Showing posts with label ubuntu. Show all posts
[Ubuntu] Cara install dan Konfigurasi Xampp di Ubuntu

[Ubuntu] Install MATLAB on Ubuntu Desktop 15.04
How to install MATLAB on Ubuntu 14.04

Introduction
MATLAB® is a
high-level language and interactive environment that enables you to
perform computationally intensive tasks faster than with traditional
programming languages such as C, C++, and Fortran.
You
can use MATLAB in a wide range of applications, including signal and
image processing, communications, control design, test and measurement,
financial modeling and analysis, and computational biology. Add-on
toolboxes (collections of special-purpose MATLAB functions, available
separately) extend the MATLAB environment to solve particular classes of
problems in these application areas.
MATLAB
provides a number of features for documenting and sharing your work.
You can integrate your MATLAB code with other languages and
applications, and distribute your MATLAB algorithms and applications.
MATLAB R2014b on Ubuntu 14.04
From ISO
- First, mount the .iso file of the image with right-click, Open with and select Disk image mounter (if required).
- Open a terminal and change to the mounted image file. For example:
- cd /media/username/MATHWORKS_R2014A
From Download
- Download the install file from http://www.mathworks.com/downloads/
- Unzip and open downloaded directoy
Install
- Run the installer as a super user
- sudo ./install
- Follow the instructions of the installer and install in /usr/local/MATLAB/R2014a
- To add an entry to the launcher and some other features, install the matlab-support package:
- sudo apt-get install matlab-support
- During the installation you have to confirm the installation path of matlab and could restrict the installation only to certain users (which I did not require). In addition you could rename the GCC libraries, but I had no problems so far so I didn't deactivate those.
- After
completion, you have to change the ownership of the .matlab folder in
the home folder to your own user account if you do not want to run
Matlab as a super user.
- cd ~ sudo chown username -R ~/.matlab
Now Matlab should also be launchable through unity and should work as intended.
MATLAB R2012a
Important Note Regarding Ubuntu 12.04
MATLAB
R2012a was released on March 1, 2012. Please note that this is prior to
the release of Ubuntu 12.04. Consequently Ubuntu 12.04 is not a
supported operating system for MATLAB R2012a as it can be seen in the MATLAB Roadmap.
MATLAB R2012a users are strongly encouraged to install R2012a on Ubuntu 10.04 LTS or Ubuntu 10.10 for best results. Help for the installation of MATLAB R2012a on Ubuntu 12.04 will however be given through this tutorial.
Important Note Regarding Student version (32-bit)
Unfortunately, 32-bit is the only version available to students.
If
you have a 64-bit system, you will have some trouble but it is normally
possible to go through each of them and the details are in the Troubleshooting section.
The following helps you be a length ahead of these problem. If you have a 64-bit system, you can still install 32-bit version of MATLAB. However, you will need to install the "ia32-libs" package before the installation. If you have Ubuntu 13.10 or later, check out this thread for more information.
Once it is installed, run the installer with the -glnx86 argument to force it to use 32-bit
sudo /media/MATHWORKS_R2012A/install -glnx86 -v
Though for R2012a it is not necessary anymore. If you don't run it with the -glnx86 argument, MATLAB will just say
Could not find JRE for glnxa64. Trying glnx86.
at the start of the installation. And it will use 32-bit.
Then, just follow the instructions of the Installation Instructions section.
After the installation, you will need to run MATLAB with the -glnx86 argument to force it to use 32-bit
matlab -glnx86
See the Troubleshooting section for more details on this.
Installation Instructions
Basic
- You will need superuser privileges. The assumption is that MATLAB install files are located at /media/MATHWORKS_R2012a in your filesystem.
See the Troubleshooting section if you get into trouble during the installation.
1. Run the MATLAB installer with the following Terminal command (The -v argument is for the install script to be verbose which means, it is more likely to warn you if something weird happens):
sudo /media/MATHWORKS_R2012A/install -v
If it complains about java, try installing install ''OpenJDK Java 6'' package because MATLAB is not compliant with Java 7.
2. When prompted to 'Choose installation type' you should select custom. This will allow you to create symbolic links to MATLAB in /usr/local/bin.

If you have a student version, the default folder will be /usr/local/MATLAB/R2012a_Student.
4. When given the option to 'Create symbolick links to MATLAB scripts in:' it is recommended that you check the box and use the supplied path /usr/local/bin.
5. You can check that your installation work by executing the following command
matlab
See the Troubleshooting section if you get errors.
Create A MATLAB Launcher/shortcut
Automatic option: install package "matlab-support", sudo apt-get install matlab-support or via the Software Center on the dashboard.
Manual option as follows.
1. Get an icon:
sudo wget http://upload.wikimedia.org/wikipedia/commons/2/21/Matlab_Logo.png -O /usr/share/icons/matlab.png
2. Get the launcher file:
sudo wget 'https://help.ubuntu.com/community/MATLAB?action=AttachFile&do=get&target=matlab-r2012a.desktop' -O /usr/share/applications/matlab.desktop
If
you have the student version of MATLAB (or simply the 32 bit version)
on a 64 bit system, you will need to modify this file. Run
gksudo gedit /usr/share/applications/matlab.desktop
Then uncomment #Exec=matlab -arch=glnx86 -desktop and comment Exec=matlab -desktop (by adding or removing the # character).
If you get two MATLAB launcher icons in your Unity laucher, try uncommenting the following line in /usr/share/applications/matlab.desktop:
StartupWMClass=com-mathworks-util-PostVMInit
If your launcher does not work, see the Troubleshooting section.
MEX functions
Warning
The content of this section has been written for R2011a with Ubuntu 10.04 and 10.10. It may vary a lot if you are using the R2012a with Ubuntu 12.04.
If you try to compile MEX functions you may see a message like the following:
Warning: You are using gcc version "4.4.4-14ubuntu5)".  The version
         currently supported with MEX is "4.3.4".
         For a list of currently supported compilers see:
         http://www.mathworks.com/support/compilers/current_release/
Note this is a warning - the MEX function will still compile.
The following instructions will setup gcc 4.3 and make it the default compiler for MATLAB:
1. Install The GNU Compiler Collection 4.3 and The GNU Standard C++ Library
2. Make a MATLAB specific bin directory for gcc symlink.
mkdir ~/.matlab/bin
3. Symlink gcc to gcc-4.3 via user MATLAB specific bin directory.
ln -s /usr/bin/gcc-4.3 ~/.matlab/bin/gcc
4. Add MATLAB specific bin directory to the front of your system $PATH within your local startup.m file.
printf "setenv('PATH',sprintf('/home/%%s/.matlab/bin:%%s',getenv('USER'),getenv('PATH')));\n" >> ~/Documents/MATLAB/startup.m
Steps
3 and 4 above may not work for at least one instance of a user trying
to compile using MEX in MATLAB R2011a running on Ubuntu 10.10. An
alternative is to do the following:
- 3a. At the MATLAB Command Window prompt, type:
mex -setup
and choose option 2 which says:
 2: /usr/local/MATLAB/R2011a/bin/mexopts.sh :
      Template Options file for building MEX-files via the system ANSI compiler
This will copy to your home directory a local copy of the file mexopts.sh.
- 4a. Then edit this local file:
sudo gedit ~/.matlab/R2011a/mexopts.sh
and replace all instances of CC='gcc' to CC='gcc-4.3', CXX='g++' to CXX='g++-4.3', and FC='gfortran' to FC='gfortran-4.3'. Save and exit. The next time you run MEX in MATLAB to compile it will work properly.
For more ideas, try this thread or this one.
Troubleshooting
No MATLAB bin directory for glnxa64
If MATLAB tells you
    ---------------------------------------------------------------------------
    Warning: Cannot locate Java Runtime Environment (JRE) . . .

             1. Either a correct JRE was not available for redistribution when
                this release was shipped, in which case you should refer to the
                Release Notes for additional information about how to get it.

             2. Or you have tried to use the MATLAB_JAVA environment variable
                to specify an alternate JRE, but MATLAB cannot find it.  Please
                run 'matlab -n' to determine what value you are using for
                MATLAB_JAVA and fix accordingly.
    ---------------------------------------------------------------------------

    matlab: No MATLAB bin directory for this machine architecture.

           ARCH = glnxa64
when you launch it, you will need to force it to use glnx86.
Solution for the command line (CLI) launch
To do so, run
matlab -glnx86
If you like launching MATLAB from the command line, you will maybe find it inconvenient to write -glnx86 each time you need to launch it. You can then add it in your ~/.bashrc (at the end if you hesitate where to put it)
alias matlab='matlab -glnx86'
Solution for the graphical (GUI) launch
You will need to add the -glnx86 argument to matlab in the exec line of your file /usr/share/applications/matlab.desktop If you have followed the 'Create a MATLAB Launcher' section, you can just comment the line with the argument -glnx86 and uncomment the next line as explained in the file.
libc.so.6 not found
If you have Ubuntu 12.04 you like get the following error when running Matlab graphically:
/usr/local/bin/matlab: 1: /usr/local/MATLAB/R2012a/bin/util/oscheck.sh: /lib64/libc.so.6: not found
or
/usr/local/bin/matlab: 1: /usr/local/MATLAB/R2012a/bin/util/oscheck.sh: /lib/libc.so.6: not found
Matlab R2012a targeted Ubuntu 10.04 and so it's looking for libc.so.6
in a different location then where is found under Ubuntu 12.04 LTS.
This can be fixed by making two small changes to matlab's oscheck.sh
script.
sudo cp /usr/local/MATLAB/R2012a/bin/util/oscheck.sh{,.original}
sudo chmod 755 /usr/local/MATLAB/R2012a/bin/util/oscheck.sh
sudo nano /usr/local/MATLAB/R2012a/bin/util/oscheck.sh
Make these two edits:
Line #177
|
/lib/libc.so.6
|
becomes
|
/lib/i386-linux-gnu/libc.so.6
|
Line #184
|
/lib64/libc.so.6
|
becomes
|
/lib/x86_64-linux-gnu/libc.so.6
|
libXmu.so.6 not found
If you get
/usr/local/MATLAB/R2012a_Student/bin/glnx86/MATLAB: error while loading shared libraries: libXmu.so.6: cannot open shared object file: No such file or directory
Java problems
If you get
exec: 2433: /tmp/install.dir.880/Linux/resource/jre/bin/java: not found
or
Exception in thread "main" java.lang.NoClassDefFoundError: Could not initialize class java.awt.Component
        at java.lang.Class.forName0(Native Method)
        ...
Finished
during the installation or MATLAB fails at startup after the installation is complete, maybe
you are trying to install a 32-bit version of MATLAB on a 64-bit system
because you have the student version or for whatever reason (see Important Note Regarding Student version and How To Install 32-bit MATLAB on 64-bit system).
In order to do that, you need to install the "ia32-libs" package.
Source
Matlab executable not in path
If the matlab executable is not in your PATH, the matlab.desktop file needs to be edited. Replace
matlab -desktop
with the full executable path (default: /usr/local/MATLAB/R2012a/bin/matlab)
/usr/local/MATLAB/R2012a/bin/matlab -desktop
or you can add the Matlab bin folder in your path at login adding this line in your ~/.profile
PATH=$PATH:/usr/local/MATLAB/R2012a/bin
Failure loading desktop class
Fatal Error on startup: Internal Error: Failure occurs during desktop startup. Details: Failure loading desktop class.
That
means Matlab has trooble loading the Java Virtual Machine. I solved it
by asking him to use the jvm installed on Ubuntu and not the version
shipped with MATLAB. So do
export MATLAB_JAVA=/usr/lib/jvm/java-7-openjdk-amd64/jre matlab
for 64 bit MATLAB (install install the "openjdk-7-jre" package first) and
export MATLAB_JAVA=/usr/lib/jvm/java-7-openjdk-i386/jre matlab -arch=glnx86
for the student version (install install the "openjdk-7-jre:i386" package first).
If it works, update the file /usr/share/applications/matlab.desktop accordingly, changing
Exec=matlab -arch=glnx86 -desktop
to
Exec=MATLAB_JAVA=/usr/lib/jvm/java-7-openjdk-i386/jre matlab -arch=glnx86 -desktopfor example (for the student version).
[Ubuntu] Install XAMPP 1.8.2 in Ubuntu Desktop 15.04

In this tutorial we would install XAMPP 1.8.2 in Ubuntu. XAMPP stand for
- X (to be read as "cross", meaning cross-platform)
- Apache HTTP Server
- MySQL
- PHP
- Perl
Go on XAMPP site and download XAMPP. URL to download XAMPP is
http://www.apachefriends.org/en/xampp-linux.html


cd /home/[Username]/Downloads
ls
ls

Make installer file to executable. Run following command
chmod +x xampp-linux-1.8.2-0-installer.run

sudo -s -H

Run installer file
./xampp-linux-1.8.2-0-installer.run

XAMPP 1.8.2 version added nice graphic setup wizard. Click on next

Keep default selected component and click on next

Installation directory is opt click on next

By default BitNami for Xampp is selected. Remove the check mark and click on next

Wait for few minutes.

Click on finish to complete the installation.

Wizard will redirect you to XAMPP default screen.


sudo /opt/lampp/lampp restart
Now access again phpmyadmin
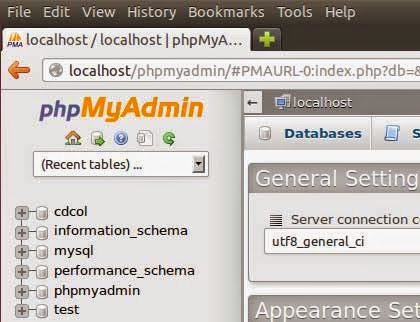
We have successfully installed XAMPP 1.8.2 in Ubuntu. In our next article
we would see how to start automatically xampp on start up.
[Ubuntu] Install NetBeans IDE 8.0 di Ubuntu Desktop 15.04
Install NetBeans IDE 8.0 di Ubuntu Desktop 15.04

NetBeans IDE 8.0 akhirnya dirilis pada tanggal 18 Maret 2014, yang menyediakan out-of-the-box kode analisis dan editor untuk berjalan dengan teknologi Java 8 terbaru.
Selain dukungan Java 8, IDE juga memiliki berbagai perangkat tambahan baru yang lebih meningkatkan dukungan untuk Maven dan Java EE dengan PrimeFaces; alat-alat baru untuk HTML5, khususnya untuk AngularJS; dan perbaikan PHP dan dukungan bahasa C atau C ++. Cek catatan rilis untuk informasi selengkapnya.

Installation Netbeans 8.0
1. Download installer
NetBeans IDE 8.0 bekerja lebih baik da lebih cepat dengan distribusi JDK, jadi anda dapat download oracle’s Co-bundled package dari link dibawah ini. Anda mungkin harus mengecek tipe OS 32-bit (x86) atau 64 bit (x64) via System Settings -> Details.
Anda juga dapat mengunduh dari bundles lain di sini
2. Membuat executable permission.
Tekan Ctrl+Alt+T pada keyboard anda untuk membuka terminal. Setelah terbuka, jalankan command dibawah untuk membuat installer executable.
chmod +x ~/Downloads/jdk-8-nb-8-linux-*.sh
Anda mungkin harus merubah “jdk-8-nb-8-linux-*.sh” menjadi seperti nama file yang anda download, setelah itu jalankan command selanjutnya.
3. Start installer
Diterminal jalankan:
cd ~/Downloads && ./jdk-8-nb-8-linux-*.sh
Ini akan memunculkan antarmuka penginstalan. Cukup ikuti dan Anda akan mendapatkan NetBeans IDE 8 terinstal pada sistem Anda.

(Optional) Untuk uninstall netbeansIDE, run
./uninstall.sh pada directory pengistallan.
Enjoy !


